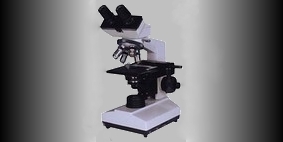
An earlier post showed how to make a Slide Culture of a Fungus for examination. In this post I'll show how to make an adhesive tape preparation of a Fungus for examination.
Adhesive Tape Preparation or Slide Culture - which should I make? Well, try both if you can. I find that sometimes one may be superior to the other when trying to capture the structure of a particular fungus.
The adhesive (sticky) tape preparation pulls up the structures and sort of locks them in place -stuck to the tape. Or, it may be a bit more disruptive and perhaps destroy or scatter some of the fungal features. You never no for sure until you try. The other issue is the clarity of the tape itself. Adhesive tape has the glue laid down on one side to make it sticky. The evenness of the glue as well as the transparency of the tape can affect the quality of the image when viewed. Adhesive tape is manufactured specifically for use with mycological specimens however I've found that any good commercial adhesive tape, such as Scotch Tape™, is quite adequate. It should be obvious but I'll say it anyways: use only clear tape -do not use 'frosted' tape!
The advantage of a slide culture is that the fungus can attach itself to the coverslip as it grows and if removed very carefully, the features will not be disturbed and can be viewed as they naturally occur. The trick is to be very gentle when removing and mounting the cover slip.
Well, nothing could be simpler: Just grow your fungus on appropriate media and take a sample. Structures may develop over time so you may wish to make adhesive tape preparations of the same fungal colony over several days. Structures may also deteriorate or disappear on prolonged incubation so timing is important in making both adhesive tape preparations and slide cultures.
Important!!! Make all preparations within a biological safety cabinet (BSC) rated at a Level 2.
Here we go:


4. Uncover petrie dish containing fungus and prepare to take a sample.


With a bit of skill, you can also use sticky tape to sample a fungus growing in a test tube.


Disinfect your scissors and dispose of all used materials in a safe manner!!
Lactophenol Cotton Blue
What is and why use Lactophenol Cotton Blue?
Well, if you wish to look as a fungus microscopically you
no doubt want to enhance the features while doing it safely. Lactophenol Cotton Blue (LPCB) is a mounting
fluid used by most laboratories examining fungi. It has several components/properties that
make it ideal for this purpose;
- Lactic Acid acts as a clearing agent and helps preserve the fungal structures
- Phenol kills the fungus making it safe to remove your slide preparation from you biological safety cabinet (BSC). Spores are often abundant and can easily infect the mycologist or contaminate the laboratory if not killed.
- Glycerol is slightly viscous and prevents drying of the prepared slide specimen.
- Cotton Blue is an aniline dye which adds colour to the fungal preparation thereby enhancing and contrasting the structures.
LPCB is sold commercially[i]
in various volumes. Pictured in the
adhesive tape preparation photographs is a single use dispenser of LPCB. A glass ampule is encased in a crushable
plastic dispenser. Crushing the glass
held within the plastic sleeve by squeezing releases the LPCB to be applied
where required.
LPCB consists of;


1. Gently
heat the phenol crystals (if used in place of the concentrated sol’n) in the
lactic acid, glycerol and water.
2. Add
cotton blue to the solution above
3. Mix
well and cool.
Notes:
Cotton Blue = Poirrier’s Blue
Solution can be stored at room temperature and dispensed
with a pipette when needed.
10% Potassium Hydroxide (KOH) can also be used in some
situations as a clearing agent which is lethal to fungi. Obviously structures will appear clear.
[i]
The LPCB pictured in these posts is manufactured by Becton-Dickinson.

.jpg)


